
Horray! Divi 3.1 is finally out and it comes with proper APIs for developers. Now we can not only count on better support from Elegant Themes but also make our modules ready for the Visual Builder. Since the day the update came out, we read through all the available docs, looked through the code and did a lot of testing to see how we can utilise what’s there and update our Developer Dojo.
It is great to have docs but so much we love them, we have to admit that they are not complete yet. A lot is missing but will eventually be added soon as the Elegant Theme staff gets to know what we developers are particularly interested in. Currently, there also is no real good place to ask questions but unofficially, ET told to us that there might – or might not? – will be a slack channel or something similar for developers to exchange their knowledge and best practices. Until then, the best place to report bugs and ask questions is the issue section of the Github repository for the create-divi-extension.
In this article, we want to help other developers to get up to speed quickly by sharing our knowledge about a few undocumented topics – at least at the time of writing this article.
The Divi loading indicator
The first thing we want to talk about is the Divis loading indicator. You surely have seen it a lot of times. The white circle with the dancing blue, orange, violet and green dots. Remember?
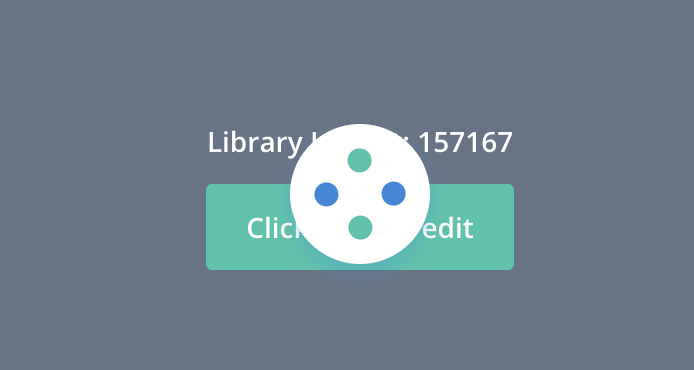
When developing your own modules, we recommend blending them in into the system as good as you can. They should feel familiar to the user and using some design elements and colors of the Divi Builder is a good choice. Instead of utilising some other third party loading indicator or writing your own one, when loading something in your module while editing a page in the Visual Builder, you should go for the default loading indicator – especially since it’s so easy to do. All you need is to add this output to your React component:
<div class="et-fb-loader-wrapper">
  <div class="et-fb-loader"></div>
</div>
Can it get any simpler? Any time you do some processing, you can display this indicator to show the user that the system is still running and something is happening under the hood – for example, if you make an Ajax call. Speaking about which…
Making Ajax calls
What a transition, it’s almost as if we had put some thought into this. So modules can now support three different levels of Visual Builder support: off, partial and on. When your module sets the public $vb_support = ‘off’;, you will just see a grey block in the Visual Builder where your module is. This is for backwards compatibility with pre 3.1 modules. If the support is set to partial, Divi will make an Ajax call and under the hood call, your modules render function. The holy grail though is to make your modules fully compatible. To do this you have to set the support to on and implement the render function in your React component.
In most cases, that’s not so hard to do. Elegant Themes even gives you some examples. Unfortunately, they are really simple and only handle the case for when all your content is defined in your module’s settings (e. g. inside text fields). But what if your module is a bit more complex or if you for example want to load a value from a custom post field. Well, then the documentation lets you down. But don’t worry, we are here to give you a helping hand and show you how to solve the riddle. The answer is Ajax and the process is actually quite easy.
First, you have to add the PHP code you want to call. You can put the code in the main plugin file in the root directory of your plugin. Lets for example take this function which loads the post title based on which post id we send via Ajax:
add_action( 'wp_ajax_nopriv_dss_get_post_title', 'dss_get_post_title' );
function dss_get_post_title(){
	$post_id = $_POST['post_id'];
	$result = [
		'title' => get_the_title( $post_id )
	];
	echo json_encode( $result );
	wp_die();
}
Next, add a constructor to your React component. In the constructor, initially set the state of your module. We can use the state object to save some information during our component’s lifecycle:
constructor(props) {
    super(props);
    this.state = {
      error: null,
      isLoaded: false,
      title: null
    };
  }
As you see we have three variables in our state. An error to store possible error information, an isLoaded boolean to determine if we need to show a loading indicator and finally the title we want to display. With this in place, we can add another lifecycle function in which we make our Ajax call:
  componentDidMount() {

    var body = new FormData();
    body.append('action', 'dss_get_post_title');
    body.append('post_id', window.ETBuilderBackend.postId);

    fetch(
      window.et_fb_options.ajaxurl,
      {
        body: body,
        method: 'POST',
      }
    )
      .then(res => res.json())
      .then(
        (result) => {
          this.setState({
            isLoaded: true,
            title: result.title
          });
        },
        (error) => {
          this.setState({
            isLoaded: true,
            error
          });
        }
      )
  }
Here we build the Ajax call and make a POST. Fortunately, Elegant Themes already stored some useful information in the window object and we can utilise it to get the Ajax URL and the ID of the current post. Of course, we could also access our module’s props and use values from them if we’d like to. Finally, it’s time to render our module:
  render() {
    const { error, isLoaded, title } = this.state;

    if (error) {
      return (<div>{error.message}</div>);
    } else if (!isLoaded) {
      return (<div class="et-fb-loader-wrapper"><div class="et-fb-loader"></div></div>);
    } else {
      return (<h1>{title}</h1>);
    }
  }
Here we load the state and check whether we have an error, are loading or if everything is okay. Now when the module is added for the first time, its constructor is called an error is null and isLoaded false. This means the render function will return the loading indicator. Then the module is mounted and our Ajax call is made. Once it is finished, the state is set which causes the component to render again. This time we either have an error or a title and can display them instead of the loading indicator.
That wasn’t too hard, was it?
Making your modules distinguishable
The final tip we want to share with you is how you can make your modules distinguishable. “But Sensei, you said our modules should blend in!” – yes, that is true. Your modules should feel familiar and have a similar look and feel when editing and using them but it happened more than once that after somebody purchased one of our modules, they asked where to find them. They just blended in too well and people didn’t recognise them in the builder. That is why we started to give them a little more noticeable design in the list of modules. This is what we mean:
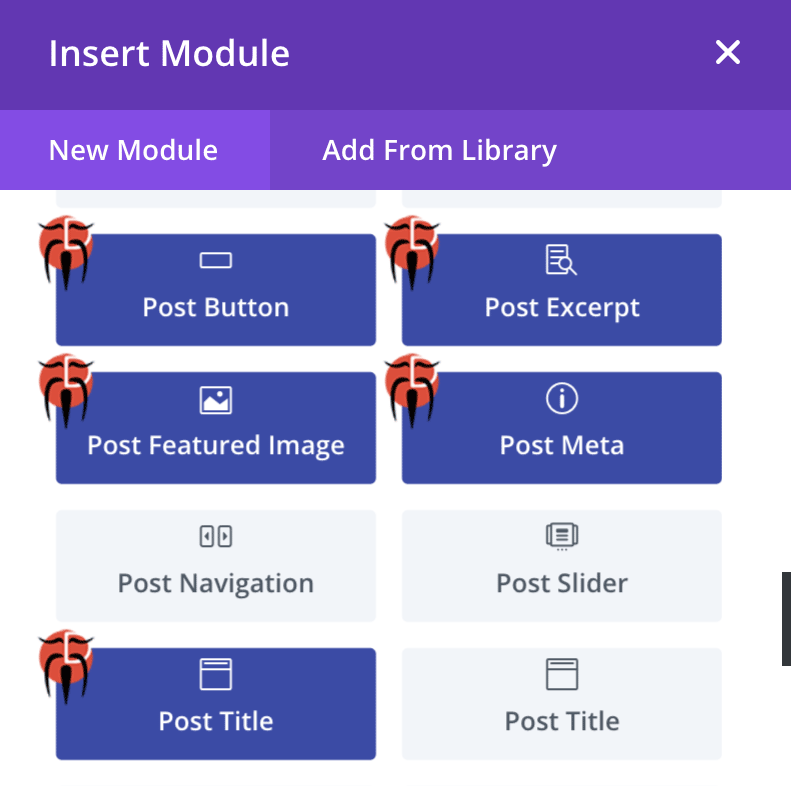
Now when you open the module list to add a new module it is immediately clear which modules are from us. This, however, is the only time we want to stand out. When you use our modules, you will not notice that they are not from Elegant Themes themselves. To achieve a look like this you have to add some CSS in two places. If you want to support the Backend Builder, you have to add the CSS to your admin CSS since the Backend Builder rund – as the name suggests – in the Backend / Admin area of WordPress:
.et-pb-all-modules .dss_post_title:before,
.et_pb_saved_layouts_list .dss_post_title:before {
content: '\61';
}
.et-pb-all-modules .dss_post_title,
.et_pb_saved_layouts_list .dss_post_title {
background-color: #3949ab;
color: white;
}
/* You can also use the ETmodules font or even Fontawesome if you want */
.et-pb-all-modules .dss_post_excerpt:before,
.et_pb_saved_layouts_list .dss_post_excerpt:before {
content: "";
font-family: 'ETmodules';
}
For the Visual Builder, you add it to the modules CSS since the Visual Builder runs in the Frontend. Each generated module comes with its own CSS file which you can use for that:
.et-fb-all-modules .dss_post_title:before {
    content: '\61' !important;
}

.et-fb-all-modules .dss_post_title {
    background-color: #3949ab;
    color: white;
    overflow: visible;
}
Conclusion
With 3.1, Divi has become even greater and developing modules has become a lot easier due to the new tools and documentation. It’s not complete yet but we are on a good way. We hope these tips will help you to develop first-class modules. If you want to get up to speed even faster, why don’t you enrol in our Developer Dojo? Do you have any more questions, want us to write about something? Let us know in the comments, we would love to exchange with like-minded.


Great article. I will be updating soon. Is the toolset plugin visual builder friendly yet? 😮
Not yet but we are working on it. 🙂
Nice article.
For the title, you might have a simpler solution.
In your jsx file, in the render
var e = this.props.attrs;
and then to display the title : {e.title}, you get the title of the page where the component is located.
The title is stored in the state of the component so I believe you have to use this.state.title to access it as the state is not part of the props. I could be wrong though. This should demonstrate how to do Ajax. If it was just about the title, you could access it even easier as the Visual Builder already stores the post title in “window.ETBuilderBackend.postTitle” so there isn’t even the need for a Ajax call. 🙂
I was making some research and I guess I was a little bit too excited, I answered to fast. Thanks for your answer.
We are missing some pointers of the infos about the page, posts, menus … . Since they don’t have much Ajax functions in their php code, I guess they have some way, it’s not documented
Yeah, the docs are not complete yet. Fortunately with Ajax you can get any information you want. I just can recommend you to print the “window” variable in the browsers console and check out what you can find in there. With these information you can basically do everything you want.
[…] Divi Module Development Tipps […]
[…] These element can be very useful for example for checking if an ajax call is loaded or not and eventually showing the Divi Loader in the meantime (we will see an example in the next weeks but for the moment you can get an idea about it giving a look at this post of JanThielemann on DiviSensei.com). […]