
Divi is a great theme, no doubt. But sometimes the standard modules are a little bit limited in the way how you can use them.
Recently we saw a question in one of the Facebook groups about how the Divi Slider could be used to display images. Sure, the slides have a field to upload an image and they also have the background image option but both settings have their drawbacks.
What if you just want an image – and only the image – on the slide while maintaining the aspect ratio of the image and having the image cover the whole slide? In other words: how can you make the Divi Slider a fullwidth image slider? Or to show what we mean:
From this…


… to this
Well, we are sorry but this is just not possible with the standard module. You either end up with a stretched or cropped background image or a way too small slide image. Either way, it is not what you want, right? There is no way around writing some CSS and to be honest, in that case, it was not the easiest thing to do. Partly because of the weird combination of hardcoded properties, partly due to dynamically set properties via JavaScript and finally, there are some media queries involved as well.
To keep things short, we came up with a responsive solution that should work in most cases. Simply add the following CSS to your themes Custom CSS field in the Divi Theme Options.
.full-image-slider .et_pb_slide {
  padding-left: 0 !important;
  padding-right: 0 !important;
}

.full-image-slider .et_pb_slide:first-child .et_pb_slide_image img.active {
 animation: unset !important;
}

.full-image-slider .et_pb_container {
  max-width: 100% !important;
  width: 100% !important;
  height: auto !important;
  min-height: 0 !important;
}

.full-image-slider .et_pb_slide_image img {
  max-height: none !important;
  width: 100% !important;
}

.full-image-slider .et_pb_slide_image {
  margin: 0 !important;
  padding: 0 !important;
  top: 0 !important;
  position: relative !important;
  width: 100% !important;
  display: block !important;
    -webkit-animation-name: fade !important;
    -moz-animation-name: fade !important;
    -ms-animation-name: fade !important;
    -o-animation-name: fade !important;
    animation-name: fade !important;
}

.full-image-slider .et_pb_slider_container_inner {
  position: relative;
}

.full-image-slider .et_pb_slide_description {
  position: absolute !important;
  top: 0 !important;
  bottom: 0 !important;
  left: 0 !important;
  right:  0 !important;
  padding: 0 !important;
  margin: 0 !important;
width: auto !important;
height: auto !important;
}

.full-image-slider .et_pb_slide_description .et_pb_button_wrapper,
.full-image-slider .et_pb_slide_description .et_pb_button_wrapper a,
.full-image-slider .et_pb_slide_description .et_pb_button_wrapper a:hover {
  width: 100% !important;
  height: 100% !important;
  padding: 0 !important;
  margin: 0 !important;
 color: rgba(0, 0, 0, 0) !important;
  border: none !important;
  background: none !important;
}

.et_pb_column.et_pb_slider_fullwidth_off.full-image-slider .et_pb_slide_description .et_pb_slide_title,
.et_pb_column.et_pb_slider_fullwidth_off.full-image-slider .et_pb_slide_description .et_pb_slide_content,
.full-image-slider .et_pb_slide_description .et_pb_slide_title,
.full-image-slider .et_pb_slide_description .et_pb_slide_content {
  display: none;
}
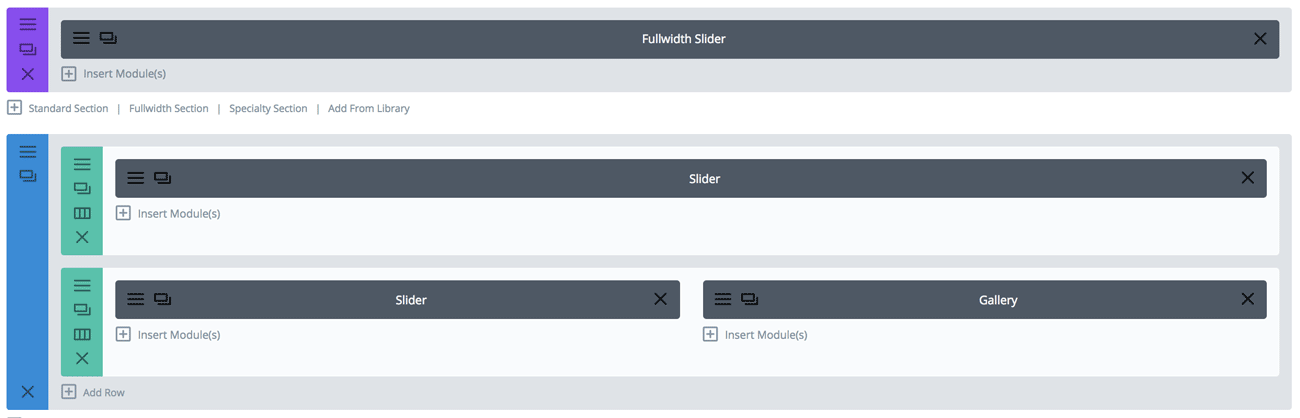
Okay, so with the CSS in place, we now can setup our slider. First, add a new Slider Module. It doesn’t matter if it is a Fullwidth Slider in a Fullwidth Section or a regular Slider in any kind of Row.
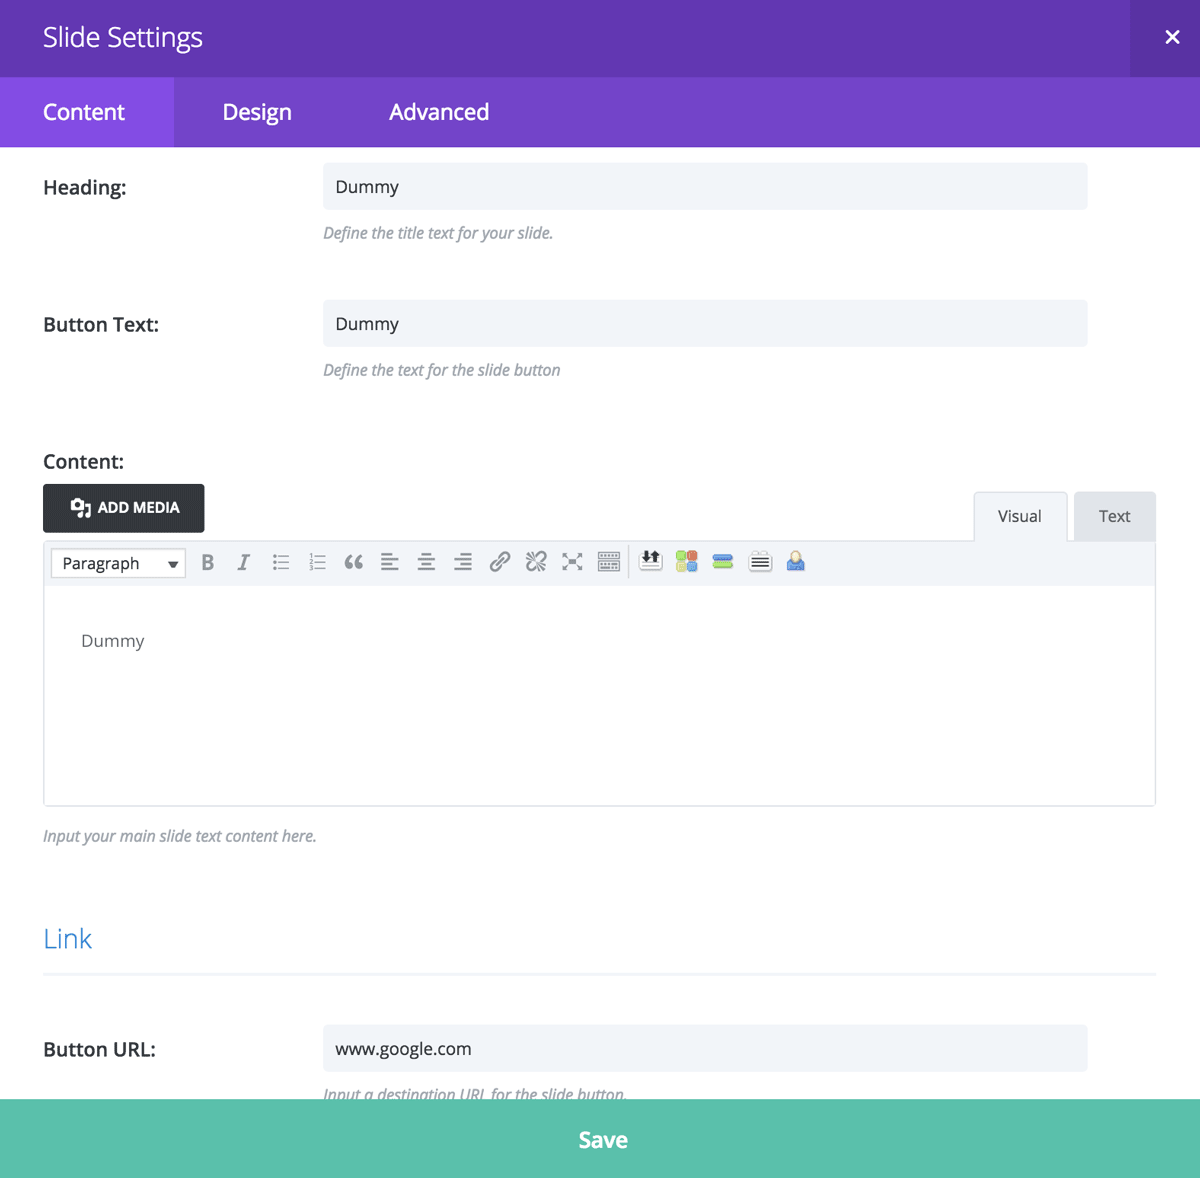
Then start adding your slides. Since the title, the button and the content will be invisible to your readers, it doesn’t matter what you put in here. However, search engines will still be able to see the text so you might want to use something which fits your content to improve your On-Page-SEO. If you want your slides to be clickable, use the Button URL field.
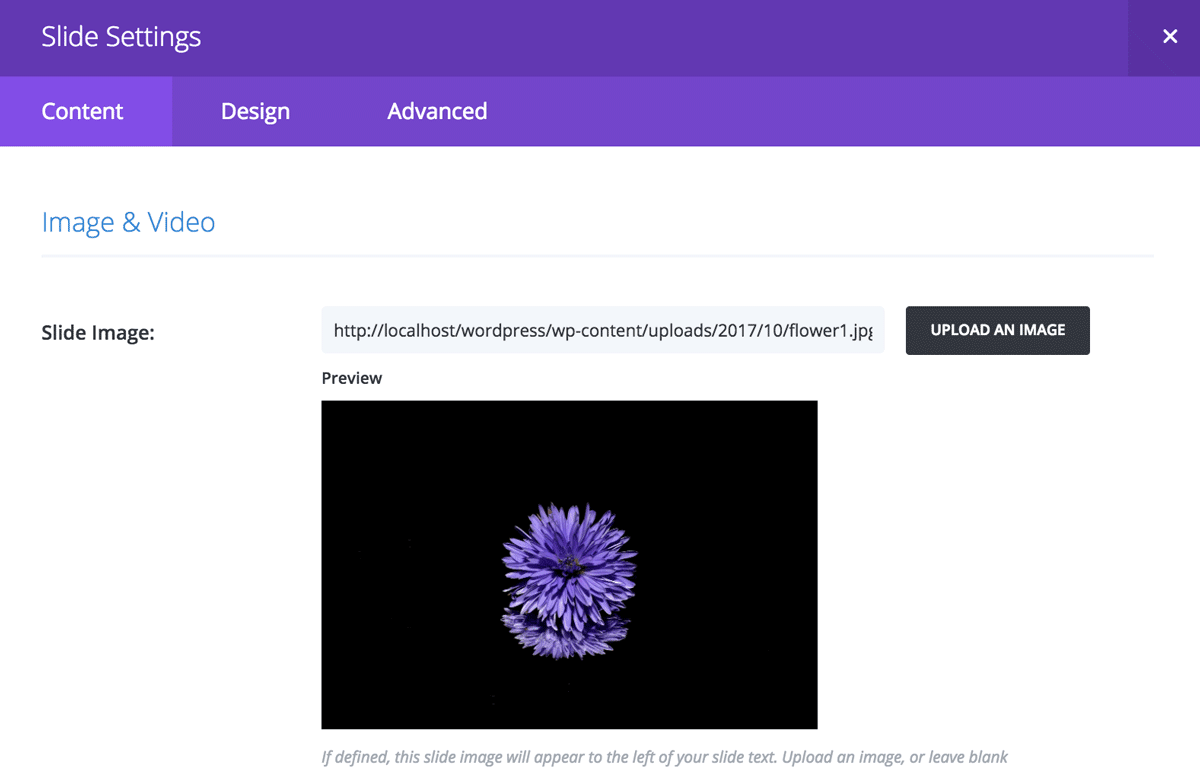
Then choose the image you want to display in your slide.
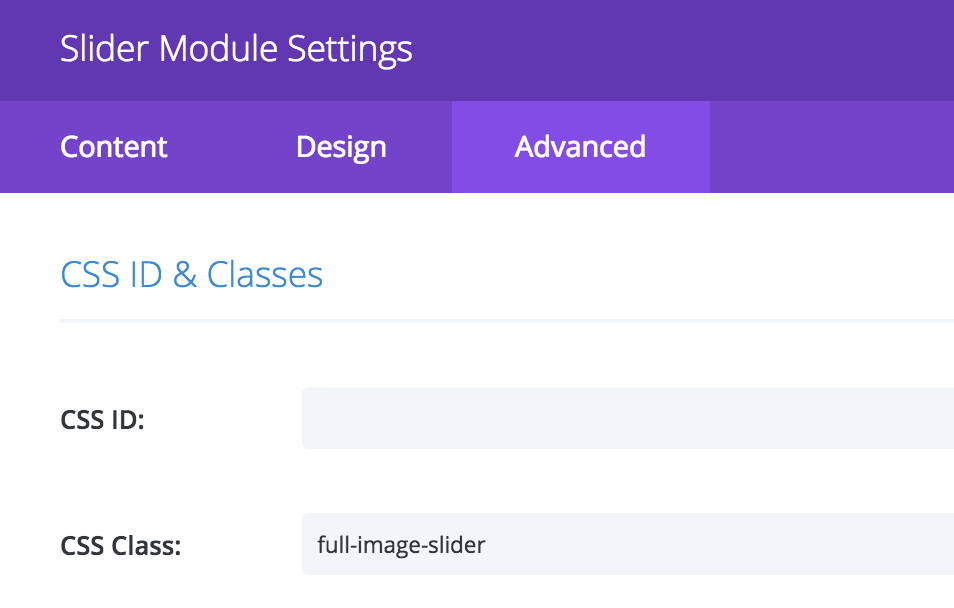
Last but not least, head over to the Sliders Advanced tab and add the “full-image-slider” class to the CSS Class field.
Thats basically all you need to do. Save the page and see your Divi fullwidth image slider in action. If you found this tutorial useful, we would be happy to see how you use the code so why not leave us a comment below?


Thanks for the tutorial! Is it possible to target a specific slider module without effecting the other slider modules on the site?
Yes, because only those sliders which have the “full-image-slider” class in the “CSS Class” field on the Advanced tab will get this effect. 🙂
Thanks a lot! Worked like a charm 🙂
perfect, it works!
Brilliant. The slider is a definite ‘annoyance’ with Divi, and after the security issues with other popular sliders, this code is great becaus it lets you modify the default Divi code to full width, so I don’t need external plugins to get this effect. KISS. Note that if you cut-&-paste the CSS it will likely put in line breaks between code lines 47-49 and 59-62, so you will need to remove these in the style.css file in your Divi CHILD theme. 🙂
… [Trackback]
[…] Read More: divi-sensei.com/blog/2017/10/25/create-fullwidth-image-slider-using-divi-slider-module/ […]
Perfect, This is what I was searching from long time.
Hi there and thank you so much for this! Would you know how I can modify the top-bottom length of the fullscreen slider…I want it to be “thinner” so that it doesn’t take up the whole screen from top to bottom. Thanks!
The fullwidth slider is intentionally always as large as the screen. You can use a normal section with a normal slider though
Hi there and thanks for this! How can I make the fullwidth slider less “high” or “thinner” so it doesn’t cover the whole screen from top to bottom but just part of the screen?…of course keeping fullwidth from less to right…
Great tutorial. Thank you much for sharing. Works great!!!
Greetings! Quick question that’s completely off topic.
Do you know how to make your site mobile friendly? My weblog looks weird when browsing from my iphone.
I’m trying to find a template or plugin that might be able to correct this problem.
If you have any suggestions, please share. Many thanks!
This worked beautifully, except the first image scrolls in from the left and the rest of my images simply appear (fade in?). I want all the images to fade in and not scroll in from the left. How do I make the first image fade in? Thanks!
PS- I’m using a child theme.
Have a look, I updated the tutorial and this issue has been fixed.
This is exactly what I need! But when I do this, the image slider does not preserve the height and when I publish the page you can’t even see the slider at all 🙁
Brilliant,
Thank you so much.
I’m probably missing a simple trick, is there a way to make the images slide automatically after say 5 seconds?
I’d like to have a video on my first slide. Will this still work?
Hi Jan. I´m not web and css-known at all. But your tutorial makes my slider work! Thanks a lot. Could you tell me, which lines I have to change that the first image does not „run in“ from the left? But just fade in? And I would like to show some content/text on the images. I just found out that I should change the display: none in display: contents. But as I do so, the content also „runs in“ from the left … What could I change? Thank you very much from a printing-designer.
Well, that I havent figured out yet. I am not sure but maybe this is done using JavaScript.
Hi Jan.
I am not a code person, but I followed your instructions and got the result!
Now, could you tell me how would I put some text over the slider images? Like, different texts for each images? Thanks in advance 🙂
Thank you so much for this, it was of tremendous help!
Great job! Exactly what I was looking for.
Greetings! Very useful advice within this article!
It is the little changes that produce the most significant changes.
Thanks for sharing!
Hello,
Is it possible to get a slider image without the text on a module. I want the same settings that work with video (where you only place the video without the text) on image but as a module. Every time I choose the slider module it comes with everything, and everything ‘slide’ including the text.
Thank you very much! Your tipp was exactly what I’ve looked for. I wonder why DIVI doesn’t have that in their library!
Thank you so much for this code ! It works ! But I have a problem : With this code, I have to click on the left or right arrow to slide, the auto-animation doesn’t work. How can I fix it ?
PS : I’m sorry for my english, I’m french…
Awesome solution. Astounding that Divis native builder cannot do this. Thank you!
Hello! I tried copying and pasting the CSS in style.css page in editor and in the CSS editor in the theme customizer. I went then follow the steps, but my “Advanced” tab shows me something different. Once I’ve added a slide, I don’t see “CSS ID & Classes.” I see “Custom CSS” and the following items, each with a blank box under it for text: “Before, Main Element, After, Slide Title, Slide Description Container, Slide Description, Slide Button, Slide Image.” After that, I see “Attributes.”
Before I add the slide, “CSS ID & Classes” appears on the Advanced tab, so I add full-image-slider there, but as soon as I actually add a slide, that disappears. Any ideas?
Never mind! Found the issue…. a performance plugin was loading images in a way that didn’t work with this code… turned it off for images and works like a charm!
great job.
What is the advantage of this versus just setting a background image to the slider and leaving the image field blank?
Background images can’t have title and alt texts so this is probably better in terms of SEO. Also you might want to use a third party plugin to open the image in a lightbox or something else which you can only do with an img element but not with a background image.
Thank you!
It worked!
Hello from Brazil!
Thanks for your help!
Thank you so much.
thank you my friend, it was a realy help for me..
Thank you very, very much!
At this point I just want to say thank you!
A very well written article without unnecessary information. Easy to handle and quickly replicable. Thanks for saving me at least 30 minutes of work. If you had a donation button, I would definitely have used it.
Thank you this worked for me too. I can see a few other people have also asked this question – is there a way we get the images slide automatically?
Your are amazing for this tutorial. Thank you!!! I had been breaking glass to try to figure this out. Thank you Thank you Thank you!!!
thank for the great tip. I didnt know what to do to have the image out come like this. Thanks
Thank you so much. This is what I need. I just implemented this full width image slider on my website.
One question, it seems the animation is not working anymore with this code. How to fix this?
That’s just awesome. Popped in that CSS and set up the fullwidth slider and -bam- exactly what I needed. Thanks for doing the legwork on that batch of code.